Pytest for Embedded Developers- Reliable, Maintainable Test Design
Embedded Software testing used to be dominated by only C or C++ with a bit of bash scripts, however in recent times the framework of firmware and embedded-software testing has been changing rapidly integrating Python’s flexibility & ease of usage, with the CI/CD integration the testing has never been faster & secured
- Testing Firmware with PyTest: A Beginner’s Guide
- 1. Introduction: Why Firmware Testing Is Changing
- 2. Why Python for Firmware Testing
- 3. PyTest in the Testing Pyramid
- 4. Testing C Firmware Artifacts: ELF Files, Shared Libraries, and Functions
- 5. Defining a Clean Test Architecture
- 6. Writing Behavior-Driven PyTest Test Cases
- 7. Using PyTest Fixtures for Firmware Lifecycle Management
- 8. Abstracting Hardware and Communication Protocols
- 9. Handling Asynchrony, Timing, and Non-Determinism
- 10. Structuring, Naming, and Classifying Firmware Tests
- 11. Common Anti-Patterns and How to Avoid Them
- 12. Making Firmware Tests CI-Friendly
- Resources
Testing Firmware with PyTest: A Beginner’s Guide
1. Introduction: Why Firmware Testing Is Changing
Firmware development has relied on manual testing, hardware-in-the-loop setups, and unit tests written in C. These approaches work, but they have limitations:
graph TD
    A[Traditional Firmware Testing] --> B[Manual Testing]
    A --> C[Hardware-in-the-Loop]
    A --> D[C Unit Tests]

    B --> E[❌ Slow Feedback]
    B --> F[❌ Human Error]

    C --> G[❌ Expensive Setup]
    C --> H[❌ Limited Availability]

    D --> I[❌ Verbose Code]
    D --> J[❌ Hard to Maintain]

    style E fill:#ffcccc
    style F fill:#ffcccc
    style G fill:#ffcccc
    style H fill:#ffcccc
    style I fill:#ffcccc
    style J fill:#ffcccc
Key challenges:
- Slow feedback loops: Flashing firmware to hardware and manually verifying behavior takes time
- Limited test coverage: Writing comprehensive tests in C is verbose and time-consuming
- Difficult debugging: Tracking down issues on embedded devices can be painful
- Poor CI/CD integration: Hardware-dependent tests don’t run well in continuous integration pipelines
💡 Key Insight
Modern firmware projects need fast, maintainable, automated testing. Python and pytest deliver exactly that.
2. Why Python for Firmware Testing
Python works well for firmware testing because:
mindmap
  root((Python for<br/>Firmware Testing))
    Rapid Development
      Concise Syntax
      Quick Iterations
      Less Boilerplate
    Rich Ecosystem
      pyserial
      pytest
      Mock Libraries
      Protocol Tools
    Excellent Tooling
      Fixtures
      Parametrization
      Detailed Reports
      IDE Support
    Easy Abstraction
      Hardware Mocking
      Interface Layers
      Clean APIs
- Rapid test development: Python’s concise syntax lets you write tests quickly
- Rich ecosystem: Libraries for serial communication (pyserial), protocol handling, mocking, and more
- Excellent tooling: pytest provides powerful features like fixtures, parametrization, and detailed reporting
- Easy hardware abstraction: Python can interface with hardware while keeping tests maintainable
🎯 Key Point
You don’t need to test firmware only in C. Python handles test orchestration, drives interfaces, and verifies behavior while your firmware runs on target or in simulation.
⚠️ Common Misconception
“Python is too slow for real-time testing!” — While Python isn’t used for real-time control, it’s perfect for test orchestration, protocol handling, and verification. The firmware still runs in C at full speed.
3. PyTest in the Testing Pyramid
Firmware testing follows the testing pyramid:
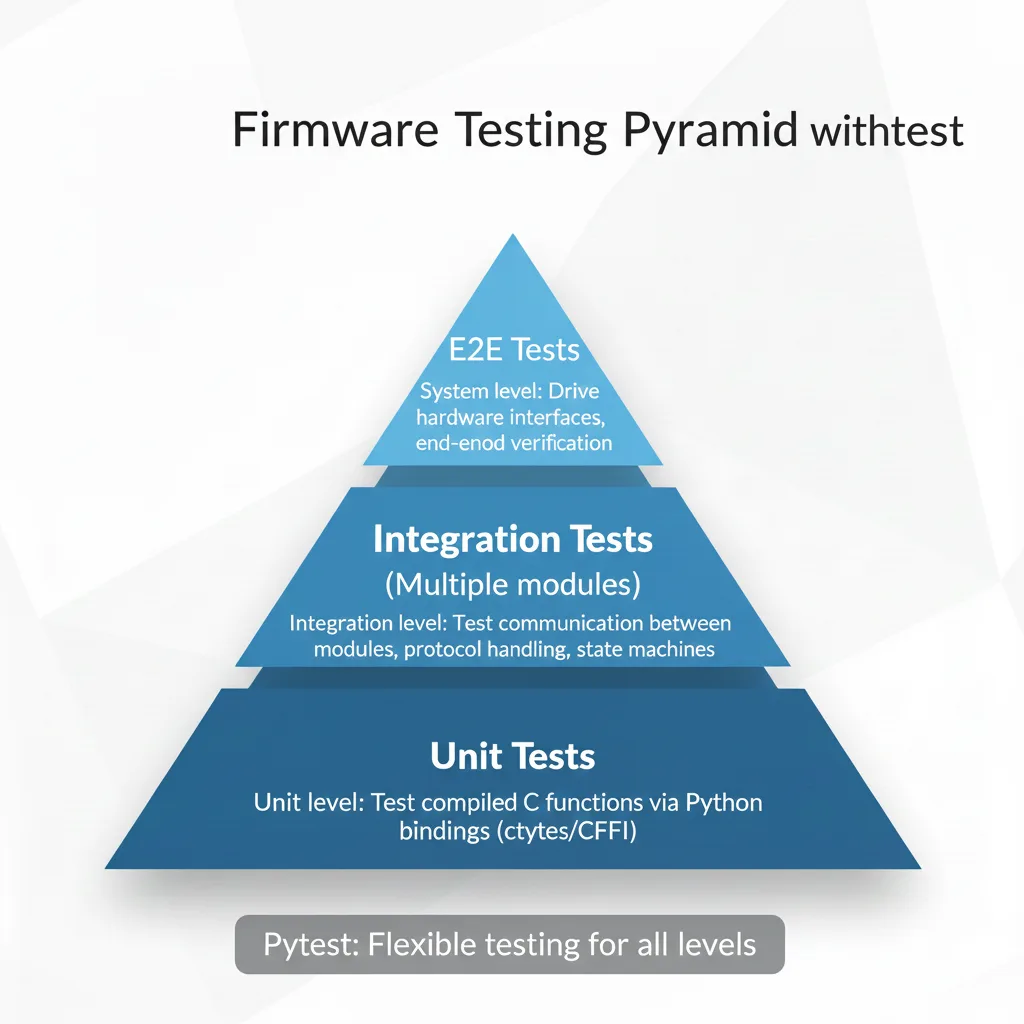
Where pytest fits:
- Unit level: Test compiled C functions directly using Python bindings (via ctypes or CFFI)
- Integration level: Test communication between modules, protocol handling, state machines
- System level: Drive hardware interfaces and verify end-to-end behavior
📊 Test Distribution
Aim for:
- 70% Unit tests (fast, no dependencies)
- 20% Integration tests (some mocking)
- 10% System/E2E tests (hardware or full simulation)
This approach tests at the right level of abstraction.
4. Testing C Firmware Artifacts: ELF Files, Shared Libraries, and Functions
To test C firmware with Python, you need to make your code callable. Here are the main approaches:
graph LR
    A[C Firmware Code] --> B{Compilation Strategy}

    B --> C[Shared Library<br/>.so / .dll]
    B --> D[Static Library<br/>.a / .lib]
    B --> E[Standalone Binary<br/>ELF]

    C --> F[Python ctypes]
    C --> G[Python CFFI]

    D --> H[Link into Test Binary]

    E --> I[Serial/Network<br/>Communication]
    E --> J[Hardware Interface]

    F --> K[✅ Direct Function Calls]
    G --> K
    H --> K
    I --> L[✅ Black Box Testing]
    J --> L

    style K fill:#90EE90
    style L fill:#90EE90
Approach 1: Compile to Shared Libraries
Compile your firmware modules as shared libraries (.so on Linux, .dll on Windows):
# Linux/macOS
gcc -shared -fPIC -o libfirmware.so firmware.c

# Windows (MinGW)
gcc -shared -o libfirmware.dll firmware.c

# Windows (MSVC)
cl /LD firmware.c /Fe:libfirmware.dll
Then load and call functions from Python using ctypes:
import ctypes
import platform

# Load the shared library (cross-platform)
if platform.system() == 'Windows':
    lib = ctypes.CDLL('./libfirmware.dll')
else:
    lib = ctypes.CDLL('./libfirmware.so')

# Define function signature
lib.calculate_checksum.argtypes = [ctypes.POINTER(ctypes.c_uint8), ctypes.c_size_t]
lib.calculate_checksum.restype = ctypes.c_uint16

# Call the function
data = (ctypes.c_uint8 * 10)(*range(10))
checksum = lib.calculate_checksum(data, 10)
⚠️ Critical: Type Matching
Always define
argtypesandrestypefor C functions. Mismatched types can cause crashes or silent data corruption that’s hard to debug!
🖥️ Platform-Specific Type Sizes
Be careful with types that have platform-dependent sizes:
int,long- Size varies (32-bit vs 64-bit)size_t- Usectypes.c_size_t(matches platform)floatvsdouble- Usectypes.c_floatandctypes.c_doubleAlways use explicit fixed-width types like
uint8_t,uint16_t,uint32_tin your C code for portability!
Common ctypes type mapping issues and solutions:
# ❌ Problem: Using wrong float type
lib.get_temperature.restype = ctypes.c_double  # C function returns float!
temp = lib.get_temperature()  # Wrong value!

# ✅ Solution: Match the C type exactly
lib.get_temperature.restype = ctypes.c_float  # Now correct
temp = lib.get_temperature()

# ❌ Problem: Platform-dependent long
lib.process_data.argtypes = [ctypes.c_long]  # Size varies!

# ✅ Solution: Use fixed-width types
lib.process_data.argtypes = [ctypes.c_int32]  # Always 32-bit

# ❌ Problem: Incorrect size_t usage
lib.buffer_size.restype = ctypes.c_int  # Wrong on 64-bit!

# ✅ Solution: Use c_size_t
lib.buffer_size.restype = ctypes.c_size_t  # Platform-appropriate

# ❌ Problem: Pointer type mismatch
lib.read_buffer.argtypes = [ctypes.c_void_p]  # Too generic!

# ✅ Solution: Use specific pointer types
lib.read_buffer.argtypes = [ctypes.POINTER(ctypes.c_uint8)]
🔍 Debug Type Issues
If you get strange values or crashes, check:
ctypes.sizeof(ctypes.c_long)vs your Csizeof(long)- Use a debugger to inspect actual C return values
- Enable Python warnings:
python -Wd your_test.py- Consider using CFFI instead for better type safety
Approach 2: Use CFFI for Complex Interfaces
For more complex scenarios, CFFI provides a better interface:
from cffi import FFI

ffi = FFI()
ffi.cdef("""
    typedef struct {
        uint8_t status;
        uint16_t value;
    } sensor_data_t;

    sensor_data_t read_sensor(void);
""")

lib = ffi.dlopen('./libfirmware.so')
result = lib.read_sensor()
💡 Pro Tip
CFFI is better for complex structs, callbacks, and maintaining type safety. Use ctypes for simple function calls, CFFI for everything else.
Approach 3: Test via Serial/Network Interfaces
For firmware running on actual hardware or emulators:
import serial

def test_firmware_response():
    port = serial.Serial('/dev/ttyUSB0', 115200, timeout=1)
    port.write(b'GET_STATUS\n')
    response = port.readline()
    assert response == b'OK\n'
5. Defining a Clean Test Architecture
A well-organized test architecture separates concerns and makes tests maintainable:
Test Directory Structure:
| Directory | Purpose | Examples |
|---|---|---|
unit/ | Pure C function tests | test_protocol.py, test_utilities.py |
integration/ | Module interaction tests | test_state_machine.py, test_communication.py |
system/ | End-to-end tests | test_firmware_behavior.py |
fixtures/ | Shared test fixtures | hardware.py, firmware_loader.py |
mocks/ | Mock implementations | mock_hardware.py |
conftest.py | pytest configuration | Shared fixtures and settings |
tests/
├── unit/                  # Pure C function tests
│   ├── test_protocol.py
│   └── test_utilities.py
├── integration/           # Module interaction tests
│   ├── test_state_machine.py
│   └── test_communication.py
├── system/               # End-to-end tests
│   └── test_firmware_behavior.py
├── fixtures/             # Shared test fixtures
│   ├── hardware.py
│   └── firmware_loader.py
├── mocks/               # Mock implementations
│   └── mock_hardware.py
└── conftest.py          # Shared pytest configuration
📁 Organization
Organize by test level (unit/integration/system), not by feature. This makes it easier to run specific test categories and understand scope.
Key principles:
- Keep unit tests fast and isolated
- Use fixtures to manage setup/teardown
- Abstract hardware access into reusable components
- Organize by test level, not by feature
⚠️ Avoid This
Don’t organize tests by C source file names (test_module1.py, test_module2.py). This creates tight coupling between test and implementation structure.
6. Writing Behavior-Driven PyTest Test Cases
Good tests describe what the firmware should do, not how it does it. Use descriptive test names and arrange tests clearly:
graph TD
    A[Test Case] --> B{Well Structured?}

    B -->|Yes| C[Arrange<br/>Set up test conditions]
    C --> D[Act<br/>Execute the behavior]
    D --> E[Assert<br/>Verify the outcome]
    E --> F[✅ Clear, Maintainable Test]

    B -->|No| G[❌ Common Problems]
    G --> H[Testing implementation<br/>details]
    G --> I[Multiple behaviors<br/>in one test]
    G --> J[Unclear test names]
    G --> K[Missing setup/cleanup]

    style F fill:#90EE90
    style H fill:#FF6B6B
    style I fill:#FF6B6B
    style J fill:#FF6B6B
    style K fill:#FF6B6B
def test_led_blinks_on_button_press():
    """When button is pressed, LED should blink 3 times"""
    # Arrange
    firmware.reset()
    firmware.set_led_state('off')

    # Act
    firmware.button_press()

    # Assert
    blinks = firmware.get_led_blink_count(timeout=1.0)
    assert blinks == 3

def test_invalid_command_returns_error_code():
    """Firmware should return ERR_INVALID for unknown commands"""
    # Act
    response = firmware.send_command('INVALID_CMD')

    # Assert
    assert response.status == ErrorCode.ERR_INVALID
    assert 'unknown command' in response.message.lower()
✅ The AAA Pattern
Arrange: Set up test preconditions Act: Execute the behavior being tested Assert: Verify the expected outcome
This pattern keeps tests readable.
Best practices:
- Use the Arrange-Act-Assert pattern
- One logical assertion per test (but multiple assert statements are fine)
- Test names should read like specifications
- Include docstrings explaining the expected behavior
💡 Test Naming Convention
Use the format:
test_<what>_<condition>_<expected_result>Examples:
test_sensor_reading_when_initialized_returns_valid_valuetest_uart_transmission_with_invalid_data_raises_errortest_state_machine_in_idle_state_accepts_start_command
7. Using PyTest Fixtures for Firmware Lifecycle Management
Fixtures handle test setup and teardown automatically. They’re crucial for firmware testing:
sequenceDiagram
    participant PT as PyTest
    participant FX as Fixture
    participant TEST as Test Function
    participant FW as Firmware

    PT->>FX: Setup fixture
    FX->>FW: Initialize device
    FX->>FW: Connect
    FX->>FW: Reset
    FX-->>TEST: Yield device

    Note over TEST: Test executes here

    TEST->>FW: Run test operations
    FW-->>TEST: Return results

    TEST-->>FX: Test completes
    FX->>FW: Cleanup
    FX->>FW: Disconnect
    FX-->>PT: Fixture teardown
import pytest

@pytest.fixture
def firmware_device():
    """Initialize firmware device for testing"""
    device = FirmwareDevice(port='/dev/ttyUSB0')
    device.connect()
    device.reset()

    yield device  # Test runs here

    # Cleanup
    device.disconnect()

@pytest.fixture
def loaded_firmware(firmware_device):
    """Device with firmware loaded and initialized"""
    firmware_device.load_firmware('build/firmware.hex')
    firmware_device.wait_for_boot(timeout=5.0)
    return firmware_device

def test_sensor_reading(loaded_firmware):
    """Test uses the loaded_firmware fixture"""
    reading = loaded_firmware.read_sensor()
    assert 0 <= reading <= 1023
🎯 Fixture Scopes
function(default): Run before/after each testclass: Shared across test classmodule: Shared across filesession: Shared across entire test runUse wider scopes for expensive setup (like hardware initialization) to speed up tests!
Advanced fixture patterns:
@pytest.fixture(scope='module')
def shared_hardware():
    """Expensive setup shared across all tests in module"""
    hw = HardwareSimulator()
    hw.initialize()
    yield hw
    hw.shutdown()

@pytest.fixture(params=['uart', 'spi', 'i2c'])
def communication_interface(request):
    """Parametrized fixture to test multiple interfaces"""
    interface = Interface(protocol=request.param)
    yield interface
    interface.close()
⚠️ Fixture Anti-Pattern
Don’t put test logic in fixtures! Fixtures should only handle setup and teardown. Keep assertions and test logic in test functions.
8. Abstracting Hardware and Communication Protocols
Never let tests depend directly on hardware details. Use abstraction layers:
graph TD
    subgraph "❌ Wrong: Direct Hardware Coupling"
        A[Test Code] -->|Direct calls| B[Serial Port]
        A -->|Direct calls| C[SPI Device]
        A -->|Direct calls| D[I2C Device]
    end

    subgraph "✅ Right: Hardware Abstraction Layer"
        E[Test Code] -->|Uses interface| F[Hardware Abstraction Layer]
        F -->|Implements| G[Serial Interface]
        F -->|Implements| H[SPI Interface]
        F -->|Implements| I[I2C Interface]
        F -->|Implements| J[Mock Interface]

        G --> K[Real Hardware]
        H --> K
        I --> K
        J --> L[No Hardware Needed!]
    end

    style A fill:#FF6B6B
    style B fill:#FF6B6B
    style C fill:#FF6B6B
    style D fill:#FF6B6B

    style E fill:#90EE90
    style F fill:#90EE90
    style J fill:#FFD700
    style L fill:#FFD700
# Bad: Test directly depends on serial port details
def test_firmware_bad():
    port = serial.Serial('/dev/ttyUSB0', 115200)
    port.write(b'\x02GET_STATUS\x03')
    response = port.read(100)
    assert response[0] == 0x06

# Good: Test uses abstraction layer
def test_firmware_good(firmware):
    status = firmware.get_status()
    assert status.is_ok()
🏗️ Dependency Inversion
High-level test code shouldn’t depend on low-level hardware details. Both should depend on abstractions (interfaces).
Creating abstraction layers:
class FirmwareInterface:
    """Abstract interface for firmware communication"""

    def send_command(self, cmd: str) -> Response:
        raise NotImplementedError

    def read_sensor(self, sensor_id: int) -> int:
        raise NotImplementedError

class SerialFirmwareInterface(FirmwareInterface):
    """Concrete implementation using serial port"""

    def __init__(self, port: str, baudrate: int = 115200):
        self.serial = serial.Serial(port, baudrate)

    def send_command(self, cmd: str) -> Response:
        self.serial.write(f"{cmd}\n".encode())
        raw_response = self.serial.readline()
        return Response.parse(raw_response)

class MockFirmwareInterface(FirmwareInterface):
    """Mock implementation for fast testing"""

    def __init__(self):
        self.state = {}

    def send_command(self, cmd: str) -> Response:
        # Simulate firmware behavior
        return Response(status='OK', data=self.state.get(cmd))
💡 Benefits of Abstraction
- Tests run without hardware (faster CI/CD)
- Easy to test error conditions
- Same tests work with different hardware
- Simpler test code
Same test code, different environments:
| Environment | Interface Type | Benefits |
|---|---|---|
| Development | Mock | Fast execution, no setup |
| CI/CD | Mock | No hardware needed |
| Hardware Test | Real | Actual verification |
flowchart LR
    A[Same Test Code] --> B{Environment}
    B -->|Development| C[Mock Interface]
    B -->|CI/CD| C
    B -->|Hardware Test| D[Real Interface]

    C --> E[Fast Execution<br/>No Setup Needed]
    D --> F[Real Verification<br/>On Actual Hardware]

    style C fill:#FFD700
    style D fill:#90EE90
    style E fill:#FFD700
    style F fill:#90EE90
Now tests can work with either real hardware or mocks!
9. Handling Asynchrony, Timing, and Non-Determinism
Firmware often involves timing-dependent behavior. Here’s how to handle it:
Polling Pattern:
- Start waiting for event
- Check condition repeatedly (poll)
- If condition met → Success
- If max time reached → Timeout with clear error message
- Keep checking with small intervals
Polling with Timeouts
import time

def wait_for_condition(check_func, timeout=5.0, interval=0.1):
    """Wait for a condition to become true"""
    start = time.time()
    while time.time() - start < timeout:
        if check_func():
            return True
        time.sleep(interval)
    return False

def test_led_eventually_turns_on(firmware):
    firmware.trigger_led()

    assert wait_for_condition(
        lambda: firmware.get_led_state() == 'on',
        timeout=2.0
    ), "LED did not turn on within 2 seconds"
⏱️ Timeout Guidelines
- Unit tests: < 100ms timeout
- Integration tests: 1-5 seconds
- System tests: 10-30 seconds
Make timeouts configurable for slower hardware!
Using pytest-timeout
@pytest.mark.timeout(10)
def test_firmware_responds_quickly(firmware):
    """Test will fail if it takes more than 10 seconds"""
    response = firmware.long_running_operation()
    assert response.success
Handling Non-Deterministic Timing
graph TD
    A[Timing Issue] --> B{Solution Strategy}

    B --> C[Multiple Samples]
    B --> D[Statistical Analysis]
    B --> E[Retry Logic]
    B --> F[Mock Time]

    C --> G[✅ Test average behavior]
    D --> H[✅ Test variance/jitter]
    E --> I[✅ Handle flaky operations]
    F --> J[✅ Control time in tests]

    style G fill:#90EE90
    style H fill:#90EE90
    style I fill:#90EE90
    style J fill:#90EE90
def test_sensor_reads_within_range(firmware):
    """Test multiple readings for stability"""
    readings = [firmware.read_sensor() for _ in range(10)]

    # Check all readings are within expected range
    assert all(900 <= r <= 1100 for r in readings)

    # Check variance isn't too high
    import statistics
    assert statistics.stdev(readings) < 50
⚠️ Avoid Flaky Tests
Never use fixed
time.sleep()to wait for firmware! Always poll with timeouts. Fixed sleeps either waste time (too long) or cause flaky failures (too short).
Mocking Time-Dependent Behavior
from unittest.mock import patch
import time

def test_timeout_mechanism():
    """Test that timeout works correctly"""
    with patch('time.time') as mock_time:
        # Simulate time passing
        mock_time.side_effect = [0, 1, 2, 3, 6]  # Jumps to 6 seconds

        result = firmware.operation_with_timeout(timeout=5)
        assert result == 'TIMEOUT'
💡 Testing Race Conditions
For timing-sensitive code, test with both minimal and extended delays. Use stress testing to expose race conditions that occur rarely.
10. Structuring, Naming, and Classifying Firmware Tests
Good organization makes tests easy to find and run selectively.
Three ways to organize tests:
| Method | Example | Purpose |
|---|---|---|
| Naming | test_uart_send_returns_success() | Clear, descriptive test names |
| Markers | @pytest.mark.hardware | Filter tests by category |
| Classes | class TestSensorInterface: | Group related tests |
Naming Conventions
# Unit tests: test_<module>_<function>_<scenario>
def test_crc_calculate_returns_correct_checksum():
    pass

def test_crc_calculate_handles_empty_buffer():
    pass

# Integration tests: test_<feature>_<scenario>
def test_uart_communication_sends_and_receives_data():
    pass

# System tests: test_<behavior>_<condition>
def test_device_boots_successfully_after_power_cycle():
    pass
📝 Naming Best Practice
Test names should be so clear that you can understand what failed without looking at the code. Think: “Test validates that [BEHAVIOR] when [CONDITION]”
Using Pytest Markers
Markers let you run specific test groups:
| Command | Runs | Use Case |
|---|---|---|
pytest -m unit | Only unit tests | Fast feedback |
pytest -m "not hardware" | Skip hardware tests | CI/CD pipelines |
pytest -m "integration and not slow" | Fast integration tests | Quick validation |
import pytest

# Define custom markers in pytest.ini or conftest.py
# [pytest]
# markers =
#     unit: Unit tests (fast, no hardware)
#     integration: Integration tests (may use mocks)
#     hardware: Tests requiring real hardware
#     slow: Tests that take >1 second

@pytest.mark.unit
def test_checksum_calculation():
    pass

@pytest.mark.integration
@pytest.mark.slow
def test_state_machine_transitions():
    pass

@pytest.mark.hardware
@pytest.mark.slow
def test_actual_sensor_reading():
    pass
Run specific test categories:
pytest -m unit              # Only unit tests
pytest -m "not hardware"    # Everything except hardware tests
pytest -m "integration and not slow"  # Fast integration tests
🎯 Marker Strategy
Use markers to categorize tests by:
- Speed:
@pytest.mark.slow- Dependencies:
@pytest.mark.hardware,@pytest.mark.network- Test Level:
@pytest.mark.unit,@pytest.mark.integration- Features:
@pytest.mark.bluetooth,@pytest.mark.sensor
Test Classes for Grouping
class TestProtocolHandling:
    """Group related protocol tests"""

    def test_valid_packet_parsing(self, firmware):
        pass

    def test_invalid_checksum_rejected(self, firmware):
        pass

    def test_timeout_on_incomplete_packet(self, firmware):
        pass

class TestSensorInterface:
    """Group sensor-related tests"""

    @pytest.fixture
    def sensor(self, firmware):
        return firmware.get_sensor(id=0)

    def test_read_returns_valid_range(self, sensor):
        pass

    def test_calibration_adjusts_readings(self, sensor):
        pass
💡 When to Use Classes
Use test classes when:
- Tests share common fixtures
- You want to group related functionality
- You need class-scoped setup/teardown
Don’t use classes just for organization—flat functions are fine!
11. Common Anti-Patterns and How to Avoid Them
| Anti-Pattern | Problem | Solution |
|---|---|---|
| Testing implementation | Tests break on refactoring | Test behavior instead |
| Test dependencies | Tests fail randomly | Make tests independent |
| Complex tests | Hard to debug failures | One assertion per test |
| Hidden dependencies | Flaky test behavior | Use explicit fixtures |
| Poor cleanup | State pollution | Proper teardown |
Anti-Pattern 1: Testing Implementation Details
# Bad: Tests internal implementation
def test_buffer_index_increments():
    buffer = firmware.get_internal_buffer()
    assert buffer.index == 0
    firmware.write_byte(0x42)
    assert buffer.index == 1  # Brittle!

# Good: Tests behavior
def test_can_write_and_read_bytes():
    firmware.write_byte(0x42)
    assert firmware.read_byte() == 0x42
⚠️ Why This Matters
Testing implementation details creates brittle tests that break when you refactor. Test the public API and observable behavior instead.
Anti-Pattern 2: Tests That Depend on Execution Order
sequenceDiagram
    participant T1 as Test 1
    participant T2 as Test 2
    participant State as Shared State

    rect rgb(255, 200, 200)
    Note over T1,State: ❌ Anti-Pattern
    T1->>State: Modify state
    T2->>State: Expects T1's state
    Note over T2: Fails if T1 doesn't run!
    end

    rect rgb(200, 255, 200)
    Note over T1,T2: ✅ Good Pattern
    Note over T1: Setup own state
    T1->>T1: Test behavior
    Note over T2: Setup own state
    T2->>T2: Test behavior
    end
# Bad: Tests depend on each other
def test_step_1_initialize():
    firmware.initialize()

def test_step_2_configure():  # Fails if step_1 doesn't run first!
    firmware.configure()

# Good: Each test is independent
def test_initialize_and_configure():
    firmware.initialize()
    firmware.configure()
    assert firmware.is_ready()
🔑 Test Independence
Every test should pass when run alone or in any order. Use fixtures to ensure clean state.
Anti-Pattern 3: Overly Complex Tests
# Bad: Test does too much
def test_everything():
    firmware.init()
    firmware.configure_uart(115200)
    firmware.configure_spi(SPI_MODE_0)
    data = firmware.read_sensor()
    firmware.process_data(data)
    result = firmware.get_result()
    firmware.send_via_uart(result)
    # ... 50 more lines ...

# Good: Split into focused tests
def test_sensor_reading_returns_valid_data():
    data = firmware.read_sensor()
    assert 0 <= data <= 1023

def test_data_processing_calculates_average():
    data = [100, 200, 300]
    result = firmware.process_data(data)
    assert result == 200
📏 Test Size Guideline
If your test has more than 3-5 assertions or tests multiple behaviors, it’s probably too complex. Split it up!
Anti-Pattern 4: Hidden Test Dependencies
# Bad: Hidden dependency on global state
config_file = 'config.json'

def test_a():
    write_config(config_file, {'mode': 'A'})
    assert firmware.get_mode() == 'A'

def test_b():  # Might fail if config_file wasn't cleaned up
    assert firmware.get_mode() == 'default'

# Good: Use fixtures for clean state
@pytest.fixture
def clean_config():
    config_file = 'test_config.json'
    yield config_file
    if os.path.exists(config_file):
        os.remove(config_file)

def test_a(clean_config):
    write_config(clean_config, {'mode': 'A'})
    firmware.load_config(clean_config)
    assert firmware.get_mode() == 'A'
⚠️ Hidden State is Evil
Global variables, shared files, and persistent state are the top causes of flaky tests. Always use fixtures to manage test dependencies explicitly.
Anti-Pattern 5: Ignoring Teardown
flowchart TD
    A[Test Starts] --> B[Initialize Hardware]
    B --> C[Run Test Logic]
    C --> D{Proper Cleanup?}

    D -->|No| E[❌ Hardware Left in Bad State]
    E --> F[Next Test Fails]
    F --> G[Debugging Nightmare]

    D -->|Yes| H[✅ Clean Teardown]
    H --> I[Next Test Starts Fresh]
    I --> J[Reliable Test Suite]

    style E fill:#FF6B6B
    style F fill:#FF6B6B
    style G fill:#FF6B6B

    style H fill:#90EE90
    style I fill:#90EE90
    style J fill:#90EE90
# Bad: Leaves hardware in bad state
def test_sensor():
    firmware.power_on_sensor()
    reading = firmware.read_sensor()
    assert reading > 0
    # Sensor left powered on!

# Good: Proper cleanup
@pytest.fixture
def powered_sensor(firmware):
    firmware.power_on_sensor()
    yield firmware
    firmware.power_off_sensor()

def test_sensor(powered_sensor):
    reading = powered_sensor.read_sensor()
    assert reading > 0
🧹 Cleanup
Always use fixtures with
yieldfor setup/teardown. Teardown code runs even if the test fails, keeping state clean for the next test.
12. Making Firmware Tests CI-Friendly
Continuous integration is crucial for catching regressions early. Here’s how to make your firmware tests work in CI:
graph TD
    A[CI Pipeline] --> B{Test Strategy}

    B --> C[Fast Tests<br/>Unit + Mocked Integration]
    B --> D[Hardware Tests<br/>Real Device Required]

    C --> E[Run on Every Commit]
    C --> F[Use Test Doubles]
    C --> G[Parallel Execution]

    D --> H[Run on Schedule/Manual]
    D --> I[Use Hardware Runner]
    D --> J[Sequential Execution]

    E --> K[✅ Fast Feedback<br/>< 5 minutes]
    H --> L[✅ Complete Validation<br/>10-30 minutes]

    style K fill:#90EE90
    style L fill:#FFD700
Separate Hardware-Dependent Tests
# conftest.py
def pytest_configure(config):
    config.addinivalue_line(
        "markers", "hardware: tests requiring physical hardware"
    )

# In CI, run: pytest -m "not hardware"
🎯 CI Strategy
Fast Pipeline (every commit): Unit + mocked integration tests (~5 min) Full Pipeline (nightly/release): All tests including hardware (~30 min)
Use Test Doubles for Hardware
flowchart LR
    A[Factory Pattern] --> B{Environment?}

    B -->|CI=true| C[Mock Hardware]
    B -->|CI=false| D[Real Hardware]

    C --> E[Fast Tests<br/>No Setup]
    D --> F[Real Validation<br/>Actual Hardware]

    style C fill:#FFD700
    style D fill:#90EE90
    style E fill:#FFD700
    style F fill:#90EE90
# hardware_abstraction.py
def get_hardware_interface():
    """Factory function that returns real or mock hardware"""
    if os.getenv('CI') == 'true':
        return MockHardwareInterface()
    else:
        return RealHardwareInterface()
💡 Environment Detection
Use environment variables to automatically switch between real and mock implementations. This keeps test code identical across environments.
Generate Test Reports
Test reports document your test results and make them accessible to your team. The most common approach is using CI/CD pipelines to automatically generate and archive reports.
When to generate reports:
- On every commit/pull request (fast feedback)
- Nightly builds (comprehensive testing)
- Before releases (quality gate)
- After manual test runs (debugging)
Where reports are used:
- GitHub Actions, GitLab CI, Jenkins, Azure DevOps
- Stored as CI artifacts
- Published to coverage services (Codecov, Coveralls)
- Shared via pull request comments
Basic CI Report Generation
Here’s a GitHub Actions workflow that compiles firmware, runs tests, and generates reports:
# .github/workflows/test.yml
# This file goes in your repository at .github/workflows/test.yml
name: Firmware Tests

on: [push, pull_request]  # Run on every push and PR

jobs:
  test:
    runs-on: ubuntu-latest  # Can be: ubuntu-latest, windows-latest, macos-latest
    steps:
      - uses: actions/checkout@v2

      - name: Set up Python
        uses: actions/setup-python@v2
        with:
          python-version: '3.9'  # Change to match your Python version

      - name: Install dependencies
        run: |
          pip install pytest pytest-html pytest-cov

      - name: Compile firmware libraries
        run: |
          # Adjust this to match your build process
          gcc -shared -fPIC -o libfirmware.so src/*.c

      - name: Run tests
        run: |
          pytest -m "not hardware" \  # Skip hardware-dependent tests
            --html=report.html \      # Generate HTML report
            --cov=firmware \           # Measure coverage
            --cov-report=xml           # XML for coverage services

      - name: Upload coverage
        uses: codecov/codecov-action@v2
        with:
          files: ./coverage.xml

      - name: Archive test reports
        if: always()  # Run even if tests fail
        uses: actions/upload-artifact@v2
        with:
          name: test-reports
          path: |
            report.html
            coverage.xml
          retention-days: 30
Customization Based on Common Needs
1. Multi-Platform Testing (Windows, Linux, macOS)
jobs:
  test:
    strategy:
      matrix:
        # Test on multiple OS and Python versions
        os: [ubuntu-latest, windows-latest, macos-latest]
        python-version: ['3.8', '3.9', '3.10']
    runs-on: $  # Dynamic OS selection from matrix
    steps:
      - uses: actions/checkout@v2

      - name: Set up Python
        uses: actions/setup-python@v2
        with:
          python-version: $  # Dynamic version from matrix
      # ... rest of steps (install, compile, test)
2. Custom Build Steps for Different Firmware Architectures
- name: Compile firmware
  run: |
    # ARM Cortex-M (real hardware target)
    arm-none-eabi-gcc -mcpu=cortex-m4 -mthumb -c src/*.c

    # Or x86 simulation (for CI testing without hardware)
    gcc -shared -fPIC -DSIMULATION -o libfirmware.so src/*.c

    # Or use your existing build system
    make test-lib  # Calls your Makefile or CMake configuration
3. Coverage Thresholds (Fail if Coverage Too Low)
- name: Run tests with coverage check
  run: |
    pytest \
      --cov=firmware \              # Measure coverage for 'firmware' package
      --cov-report=term \            # Show coverage in terminal output
      --cov-fail-under=80            # Fail build if coverage < 80%
4. Multiple Test Suites with Different Speeds
jobs:
  fast-tests:
    runs-on: ubuntu-latest
    steps:
      - name: Run unit tests only
        run: pytest -m unit --maxfail=1  # Stop on first failure (fail fast)

  slow-tests:
    runs-on: ubuntu-latest
    needs: fast-tests  # Only run if fast tests pass (dependency)
    steps:
      - name: Run integration tests
        run: pytest -m integration --timeout=300  # 5 minute timeout per test
5. Scheduled Hardware Tests
on:
  push:
    branches: [main]  # Run on pushes to main branch
  schedule:
    - cron: '0 2 * * *'  # Run at 2 AM UTC daily (cron format: min hour day month weekday)

jobs:
  hardware-tests:
    runs-on: self-hosted  # Use self-hosted runner with physical hardware attached
    steps:
      - uses: actions/checkout@v2

      - name: Run hardware tests
        run: pytest -m hardware --verbose  # Only run tests marked with @pytest.mark.hardware
6. Publishing Reports to GitHub Pages
- name: Deploy reports to GitHub Pages
  if: github.ref == 'refs/heads/main'  # Only deploy from main branch
  uses: peaceiris/actions-gh-pages@v3
  with:
    github_token: $  # Automatically provided by GitHub
    publish_dir: ./htmlcov                      # Source directory with HTML reports
    destination_dir: coverage-reports           # Target path on gh-pages branch
    # Reports will be available at: https://username.github.io/repo/coverage-reports/
7. Custom Report Formats and Locations
- name: Generate multiple report formats
  run: |
    pytest \
      --html=reports/test-report.html \      # HTML report for human reading
      --junitxml=reports/junit.xml \          # XML for CI tools (Jenkins, etc.)
      --cov=firmware \                        # Measure coverage
      --cov-report=html:reports/coverage \    # HTML coverage report
      --cov-report=term-missing               # Show missing lines in terminal
Common Customization Factors:
| Need | Customization |
|---|---|
| Different Python versions | Add to matrix.python-version |
| Cross-platform testing | Add to matrix.os |
| Custom compiler flags | Modify Compile firmware step |
| Specific test categories | Change -m marker in pytest command |
| Coverage threshold | Add --cov-fail-under=X |
| Report retention | Change retention-days in upload |
| Conditional runs | Use if: conditions on steps |
| Hardware access | Use runs-on: self-hosted |
| Report publishing | Add deploy steps |
💡 Pro Tip
Start with a simple workflow and add complexity as needed. Test your workflow changes in a feature branch before merging to main.
📊 CI Metrics to Track
- Test execution time
- Code coverage percentage
- Number of tests passing/failing
- Flaky test rate
- Hardware availability uptime
Optimize Test Execution Time
graph TD
    A[Test Optimization] --> B[Parallel Execution]
    A --> C[Smart Caching]
    A --> D[Conditional Running]

    B --> B1[pytest-xdist<br/>Run tests in parallel]
    C --> C1[Cache compiled libraries<br/>Cache dependencies]
    D --> D1[Skip slow tests on PRs<br/>Full suite on main]

    E[Results] --> F[✅ 10x Faster CI]
    E --> G[✅ Better Developer Experience]
    E --> H[✅ More Frequent Testing]

    style F fill:#90EE90
    style G fill:#90EE90
    style H fill:#90EE90
# Run slow tests only on main branch
import os
import pytest

def pytest_collection_modifyitems(config, items):
    if os.getenv('CI_BRANCH') != 'main':
        skip_slow = pytest.mark.skip(reason="Slow test skipped on PR builds")
        for item in items:
            if "slow" in item.keywords:
                item.add_marker(skip_slow)
⚡ Performance Tips
- Use
pytest-xdistfor parallel execution:pytest -n auto- Cache compiled firmware between runs
- Run only changed tests first (fail fast)
- Use module-scoped fixtures for expensive setup
Cache Build Artifacts
# In CI config - speeds up builds by caching compiled artifacts
- name: Cache compiled firmware
  uses: actions/cache@v2
  with:
    path: |                                                   # Directories/files to cache
      build/
      *.so
    key: ${{ runner.os }}-firmware-${{ hashFiles('src/**/*.c') }}  # Cache invalidates when C files change
    # Cache is shared across workflow runs for the same OS and source file hash
Complete CI/CD Pipeline Architecture
flowchart TD
    A[Push to Branch] --> B[CI Trigger]

    B --> C[Fast Pipeline]
    C --> D[Lint & Format Check]
    D --> E[Compile Firmware]
    E --> F[Unit Tests]
    F --> G[Mocked Integration Tests]

    G --> H{Pass?}
    H -->|Yes| I[✅ Allow Merge]
    H -->|No| J[❌ Block Merge]

    I --> K[Merge to Main]
    K --> L[Full Pipeline]

    L --> M[All Tests<br/>Including Hardware]
    M --> N[Generate Artifacts]
    N --> O[Deploy to Staging]

    O --> P{Manual Approval}
    P -->|Yes| Q[Deploy to Production]

    style C fill:#FFD700
    style I fill:#90EE90
    style J fill:#FF6B6B
    style L fill:#4A90E2
🎯 Pipeline Tips
- Fail Fast: Run fastest tests first
- Use Parallelism: Speed up test execution
- Clear Feedback: Make failures obvious
- Retry Flaky Tests: Auto-retry once before failing
- Save Artifacts: Keep logs and reports for debugging
💪 Remember
Every test improves your firmware’s reliability and your team’s productivity.
Resources
- pytest documentation
- ctypes documentation
- CFFI documentation
- PySerial documentation
- pytest-xdist for parallel testing
- Testing Best Practices by pytest
Happy testing! 🚀